Lego Hockey Arena: Building the Ultimate Ice Rink with Lego Bricks
Are you a hockey fan and a Lego enthusiast? Imagine combining both passions to create your very own Lego hockey arena! Building a Lego hockey rink is not only a fun project but also a fantastic way to showcase your love for the sport. In this article, we’ll dive into everything you need to know to create the perfect Lego hockey arena—from design inspiration to step-by-step construction tips. Let’s get started on this exciting building adventure!
Why Build a Lego Hockey Arena?
Creating a Lego hockey arena is an exciting challenge for both beginner and advanced builders. Whether you’re looking to build a mini replica of your favorite hockey rink or design an entirely new concept, there are endless possibilities with Lego. Building your own Lego arena allows you to express creativity, practice your construction skills, and even have a mini-game with friends and family.
Benefits of a Lego Hockey Arena:
- Creativity Unleashed: You can customize every detail, from the rink’s layout to the colors of the teams.
- Skill Development: As you build, you’ll develop problem-solving skills, patience, and attention to detail.
- Fun and Interactive: Once completed, your Lego hockey arena can be used for playful hockey matches, enhancing the fun factor.
Planning Your Lego Hockey Arena Design
Before you dive into your Lego hockey arena build, it’s essential to have a clear plan. Think about the size, layout, and key features you want in your rink. Are you building a professional-looking stadium, or a smaller DIY rink for fun? Here are some design elements to consider:
Choosing the Right Size and Scale
Start by deciding on the scale of your Lego hockey arena. If you’re building a smaller model, you can use a simple rectangular base with just a few features. If you want a larger, more intricate model, consider including stands for fans, locker rooms, and even a scoreboard.
Key Features to Include:
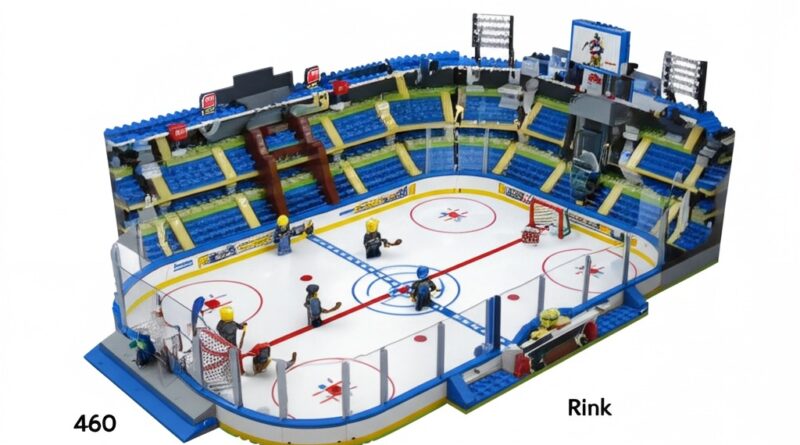
- Ice Surface: Create a smooth, flat surface that represents the ice rink.
- Goal Nets: Use Lego pieces to craft realistic goal nets at each end of the rink.
- Team Benches: Add player benches along the sides of the rink.
- Spectator Stands: Build stands or seating for Lego fans to watch the game.
- Scoreboard: A digital or manual scoreboard adds a finishing touch to your arena.
Step-by-Step Guide to Building Your Lego Hockey Arena
Once you have your design figured out, it’s time to get building! Follow these steps for an efficient and fun construction process.
Step 1: Gather Your Lego Pieces
Start by collecting all the necessary Lego pieces. Depending on your arena’s design, you’ll need different shapes and colors of bricks. You can also purchase additional Lego kits or accessories for added details, such as player minifigures or team logos.
Essential Pieces to Have:
- Flat bricks for the ice surface
- Transparent pieces for the glass panels
- Curved bricks for the rink’s rounded corners
- Mini-figures for players and fans
- Small pieces for goals and benches
Step 2: Build the Ice Surface
The first step in creating your Lego hockey arena is building the ice rink. Begin by creating a rectangular base using flat Lego bricks. If you’re aiming for a realistic look, use white or light blue pieces to represent the ice. Don’t forget to leave space for the rink’s perimeter, where you’ll later add boards and glass.
Step 3: Construct the Rink’s Perimeter and Glass Walls
The next step is to build the surrounding boards and glass walls that define the rink’s boundaries. Use transparent Lego pieces to mimic the glass panels commonly seen in real hockey arenas. This part adds realism to your design and provides a protective barrier for the Lego hockey players.
Step 4: Add Team Benches and Seating
Now, create the benches where the players will sit. These can be simple Lego structures placed on either side of the rink. For added flair, you can place small Lego minifigures as players on the benches.
Next, build spectator stands for fans to sit and enjoy the game. Depending on the space available, you can create small seating arrangements or larger grandstands for a more impressive setup.
Step 5: Final Touches – Goal Nets, Scoreboard, and Details
Lastly, add the finishing touches that bring your Lego hockey arena to life! Build goal nets at both ends of the rink using small Lego pieces, and set up a scoreboard in the middle to track the action. If you have space, consider adding extra details like a penalty box, locker rooms, or even a Zamboni machine!
Tips for Enhancing Your Lego Hockey Arena
Once your basic Lego hockey arena is built, you can further enhance its design with a few creative touches. Here are some ideas to take your rink to the next level:
1. Add Movable Elements
To make your Lego hockey arena interactive, consider adding movable elements. For example, use hinges to create a sliding door for the locker room or a rotating scoreboard to keep track of the score.
2. Create Mini-Scenes Around the Arena
Build surrounding scenes like concession stands, a parking lot, or even a team bus arriving at the rink. These details help create a more immersive experience for those who admire your Lego arena.
3. Incorporate Team Logos and Branding
You can add logos or team names to the ice or boards using small Lego stickers or custom prints. This customization will give your arena a professional look and make it feel like a real NHL rink.
Conclusion: Build Your Dream Lego Hockey Arena Today!
Building a Lego hockey arena is a rewarding and creative project for hockey lovers and Lego enthusiasts alike. Whether you’re replicating a famous rink or designing your unique stadium, the possibilities are endless. Start by planning your design, gather your Lego pieces, and dive into the construction process with our step-by-step guide.
Don’t forget to add your personal touches, and soon you’ll have a stunning Lego hockey arena that you can proudly display. Ready to start building? Grab your bricks and get to work on your ultimate Lego rink today!